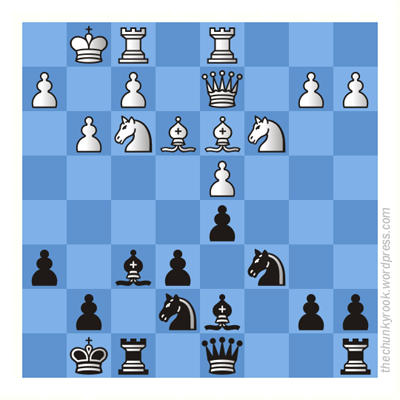
I’d like to continue my discussion of chess intuition and respond to some of the comments to my previous post with a position from Hendrik’s Move First, Think Later:
 Black to Move
AoxomoxoA wrote “There is a difference between learning and doing.” This, I believe, is an extremely important observation that gets at the heart of the Hendriks–Silman controversy (for lack of a better label). In my current estimation, Hendrik is spot on when he’s talking about what is happening on the board, while we are doing chess, regardless of whether you’re a beginner or a master. However, I’d say where learning chess is concerned, Hendriks’ ideas are not quite as helpful. In this, I am echoing John Watson and Jeremy Silman in their respective reviews of Move First, Think Later.
Let’s look at doing chess first. So you’re sitting at the chessboard. You’re facing the position above and you want to make a good move. Here I’ll side with Hendriks and say that simply looking at the position and working with the ideas and moves that enter your head in no particular order is just as effective as trying to impose some kind of disciplinary measure on your thinking by forcing yourself to first look at general features. And if you have no clue about what’s going on in this position, forcing yourself to think about open lines, king position, etc. won’t yield any more decent moves than just looking at the position again and to think about it some more. I’ll even join Hendriks in expressing doubts as to whether “blunderchecking” is a good idea; not so much because it’s not a good idea in theory, but because it’s not really something you can actually do in practice.
To my mind, the most convincing argument against measures such as checklisting or blunderchecking is summed up by Hendriks in this quote: “Chess is solving too difficult problems in too little time.” (136) At first glance, checklists and blunderchecks appear to help you tackle exactly that dilemma: they promise to break down the position into easier-to-digest questions that give you some sort of anchor amidst the chaos. They don’t seem to demand a huge time investment, either: after all — or so we like to tell ourselves — you “just” look quickly at the features of a position, or you “just” quickly check if your move isn’t a blunder.
But I think we’re deluding ourselves when we attest these great virtues to checklisting and blunderchecking. If you’re the kind of chess player who feels he needs checklists to help him come up with better moves, or who feels she needs to blundercheck to improve her game, you’re probably not the kind of chess player who can actually apply these measures over the board in any practical sense. Your chess thinking is messy enough as it is, and by forcing yourself to follow a protocol or do a blundercheck, you’re simply demanding too much of your chess brain. How are you going to deal with the simple question when to blundercheck, for example?
Let’s look at the position above. Say you play 1. … Bg5 and after 2. Nxg5 hxg5 3. Lxg5 you tell yourself “Stupid, I should have blunderchecked before moving Bg5!” But what you’re really saying is that you should have blunderchecked on every previous move plus all the candidate moves you’ve been calculating. Because if you’re the type of chess player who makes mistakes such as a 1. … Bg5? and doesn’t more or less immediately see that it loses a pawn, you’re the type of chess player who is prone to blunder in every position and hence the type of chess player who — according to the idea behind blunderchecks — ought to do a blundercheck every single time you make a move in your head. In practice, this is obviously impossible. The only viable, sensible way of “blunderchecking” is to look at the board, concentrate, calculate as best as you can, and hope you don’t make a stupid mistake.
And the same goes for checklists. Apart from the fact that working in earnest through a checklist in your head and pulling the various strings it creates together requires a lot of time, we’re probably deluding ourselves again if we believe that checklists allow us to do something that simply looking at the board and focusing doesn’t. If you’re a chessplayer who needs a checklist to figure out a position because you’ve got no clue what’s going on, all that a checklist’s likely going to do is confuse you eight times over — once for every item on the list. I’d imagine something like this: “Alright, I’ve no clue what’s going on — checklist time! So, what have we got here? 1. Material balance: okay, I have the same amount of pawns, same amount of knights, same amount of bishops and rooks and queens … material is equal. Alright! So far, so good. What’s next? Immediate threats. Well. Erm. Well… checks & captures, checks & captures, let’s look at those … Lxh6, is that a threat? I don’t know … I take, he takes …” and you end up right back where you started, namely in analysing a bunch of moves, trying to see as much as possible, and depending on your level ending up with a certain amount of understanding and a certain amount of confusion. The same, it seems to me, could have been achieved much more easily and economically by simply looking at the board and telling yourself to focus and think.
I know this may sound a bit facetious. But my point is this: when I try to picture what blunderchecking or checklisting would look like in practice, these seemingly “simple” methods turn out to be just as complex and demanding in their implementation as “just” looking at the board, trying to see as much as possible and not to miss anything stupid. They are not shortcuts. Rather, they’re ways of postponing the inevitable, namely that playing chess is solving difficult problems in very little time.
Here’s another argument against trying to discipline your thought process somehow: Your ultimate goal is not to use checklists and blunderchecks in real games. So why would you train yourself using them? The main argument is the notion that conscious, repeated usage will transfer them to your subconscious. But remember it’s not the blundercheck or checklist itself we want in our subconscious, it’s seeing the bad moves and good moves themselves. We don’t want an automatic, instinctive voice in our head every move that says “Check for blunders! Check for blunders!” or “What is the material balance? What are immediate threats? What about king safety? What about open lines? What about pawn structures and squares? What about pieces and development?”. That’d be hugely annoying. What we actually want is an eye that immediately sees “1. Nd5 Qxd5 loses a piece.” or “1. Te1 places the rook on an open line.” or “1. Bxf7! Kxf7 2. Ng5+ Ke8 3. Qxg4.”
Yet as far as learning chess is concerned, I’d say Hendrik has much less ground to criticize things such as “verbalization”, “general principles” or “thinking about the general features of a position”. Because what is the goal of chess learning? That over the board, good moves pop into your head. How do good moves pop into your head? By remembering chunks from our previous games and from training; and it’s often easier to remember chunks if they’re connected to some kind of understanding. I believe nobody would contest that having some sort of understanding of a chunk makes it easier to recall it later, and it’s quite clear that it’s in most cases useless to learn moves devoid of context or understanding. Just seeing this move repeatedly, like this …
 … won’t contribute much to your decision to make exactly this move in the above position rather than any other legal move. Instead, it’s a combination of moves, positional context and understanding that you need to remember, something more like this:
 And at this point, a coach would give you a verbal explanation of what the long-term purpose of this move is, in order to add understanding to the chunk.
As Hendrik himself points out, you won’t arrive at this move on your own by virtue of just looking at a position. Even if you were exposed to similar positions featuring this manoeuvre, you probably wouldn’t be able to pick it out as significant unless your chess understanding is already up to the task. So the reason we need a teacher’s verbalization/general principles/thinking about the features of a position in combination with concrete moves is that the position with all its features is too complex for us to isolate the pattern we’re supposed to remember. Of course, there are talented people who can pull this off on their own (and especially young learners have an uncanny ability to simply magically hone their chess intuition merely by being exposed to lots of input); but the average adult learner, who has neither the time nor the young learner’s brain to do that, depends on a competent external source to reduce the complexity of a position and isolate chunks that he or she can then try and absorb through repeated exposure. A learner, left to his own devices, won’t be able to isolate or retain any of the chunks if you just throw a bunch of positions with moves at them. Generalizations/principles/verbalization provide the reduction in complexity necessary to anchor chunks in memory and facilitate recall at a later stage.
To sum up: When doing chess, we cannot hope to reduce the complexity of a position and create the right chess chunks from scratch on our own within reasonable time, no matter how disciplined our thought process. We have to rely on what’s already there in our chess intuition. When learning chess, on the other hand, we have a competent teacher to guide us in reducing the complexity of a position, and this competent, guided reduction will help us pick up new chess chunks.
 Black strives for an equal position, and this is a useful little chunk to simplify the position as a first baby step towards equality.


 Posted by chunkyrook